Handling glass panels
Our glass panels are made from toughened safety glass, and the glass is very strong but not unbreakable.
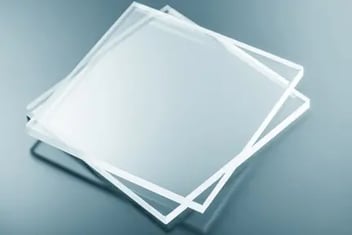
Glass panels are wrapped in cardboard and have plastic corner bumpers for safety.
Handling your glass panels safely is easy if you follow our tips:
Dress for safety
Always wear gloves and work boots when handling glass. A long sleeve shirt, safety glass
Prepare the area
Make sure you’ve got a soft place to rest the panels, timber blocks, blanket or old towels work well.
Ensure you’ve got a clear, dry path when carrying the panels.
Bring a buddy
Working with a partner will help you lift heavy panels safely. And you’ll get the job done faster.
Handle with care
Use glass suction cups and put the glass down gently, so you don’t damage it. Don’t knock the panels against each other, the corners of the glass are its weakest point make sure you don’t tap the corner on something hard like concrete as the panel could shatter.
Watch our glass handling video
Storing the glass panels
Your glass order will arrive on a pallet with panels strapped in flat a pack, and the pack is wrapped in plastic, ensure once you have unwrapped the pallet that you don’t leave the glass panels exposed to rain, the cardboard wrapping will get wet, and it will be challenging to unload the glass.
Moving the glass panels
Glass panels are a two-person lift, panels are heavy and can be awkward to maneuver into place, laying the panels flat on timber gluts is the safest and easiest solution.
Unboxing the glass panels
Glass panels are wrapped in a white film and packaged in a cardboard box, and each panel has four plastic safety corners to prevent damage from bumps in transport. The cardboard packaging has a taped join on one side.
Using a sharp knife cut the tape on each end of the box and a lift the cardboard packing up to cut the tape, making sure the knife blade does not scratch the glass. Open the box and fold back the cardboard, remove the white protective film and leave the plastic corners on the glass until the panel is in its final location.
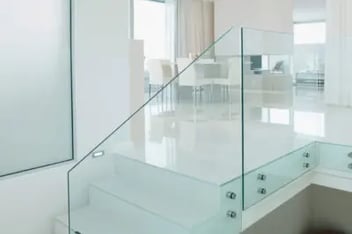
Installing the glass panels
For flanged/bolt down spigots:
- Have two pieces of timber, 90x45mm or similar directly in front of the spigots that the glass panel will be installed to.
- Place a plastic corner protector in each spigot to hold open the spigot to receive the glass.
- Ensure the spigot clamping screws are out and the cover ring is installed on the spigot.
- Carry the glass panel to the location to be installed, place the glass panel on the timber blocks to enable you to change hand positions to insert the glass.
- Ensure the stamp on the corner of the glass is at the bottom of the panel if you’re really fussy make sure the stamp is on the same side for all panels.
- Carefully lift the glass making sure it is vertical and lift the panel in slowly to the spigots.
- The plastic corners will pop out of the side of the spigot once the glass is lowered in position.
- Adjust the position of the glass for correct location and ensure the panel is level and plumb, tighten the spigot clamping screws. Repeat for each panel.
For core drilled spigots:
- Glass panel installation is a two-person job, don’t attempt this solo as you’ll potentially damage the glass or yourself!
- Spigots and cover rings are fitted to the glass, and the glass panel and spigots are lifted together and inserted into the holes in the concrete slab, the panel of glass rests on leveling blocks to hold the glass at the correct height.
- Spigots are fitted to the glass at spacings recommended in the installation guide.
- A rubber band is used to hold the cover ring in place.
- Ensure the stamp on the glass is at the bottom of the panel.
- Ensure the spigot is square to the sheet of glass at the correct spacing and clamping screws are securely tightened.
- Once the glass panel is prepared for installation place a sheet of cardboard in front of the spigot holes to rest the spigots on, by doing this, it will prevent the spigots from marking the surface.
- Carry the glass into the location and place the panel in the upright position onto the cardboard, standing on each end of the glass panel, lift the glass into the core holes resting on the leveling blocks. Once in place, the glass needs to be braced in location. Repeat for each panel.
For pin fixed/side mounted glass:
- Glass panel installation is a three-person job, don’t attempt this solo as you’ll potentially damage the glass or yourself!
- Standoff bodies are fitted to the wall, six standoffs per panel.
- Prepare the glass panel by unboxing the panel ready for installation.
- Ensure the standoffs have studs inserted and the plastic bushes are fitted to the studs to ensure there is no glass to metal contact. The body fitted to the wall should have the washer installed. The standoff cap should have the self-adhesive washers fitted.
- At the location of the installation, place a cardboard sheet or timber blocks on the ground to protect the glass. Carry the panel to the installation location ready for fitment.
- The person on the lower level should have the six standoff caps ready to secure the glass.
- The glass must be lowered from the balcony or platform by two people, and the third person guides the panel down over the standoffs making sure not to scratch the glass or hit the studs. Place them over the studs resting on them.
- Once the panel is in the location, the caps can be screwed on the studs securing the glass in position. With the standoff tool, the caps can be tightened in place. Repeat for each panel.
And remember to slip, slop, slap
Always be sun safe when you’re working outside.